

It’s cleared, it’s ready to go, but it’s still in your house for a week, now what? That in-between time is where most “I did everything right” sellers start second-guessing themselves.
You’re trying to keep it safe around family and visitors, keep it secure from theft, and keep it looking exactly like it did when you decided to sell. The problem is you also don’t want a well-intended storage choice to create a compliance headache later.
The tradeoff is simple: you need it inaccessible to the wrong hands and protected from avoidable condition damage, without accidentally stepping into a legal mess.
Security isn’t hypothetical. A peer-reviewed analysis of the 2015 National Firearms Survey estimated about 380,000 firearms were stolen in 2015 across roughly 250,000 theft incidents, with over 70% taken from residences and over 20% from vehicles, and many thefts involving guns that owners reported were not locked up (Hemenway, Azrael & Miller, JAMA Internal Medicine, 2017).
You’re going to end up with a storage workflow that keeps your firearm secure, compliant, and in the same condition until transfer day. That starts by making it truly inert and documenting exactly what you have, so the rest of your storage choices are easy to stick to.
Step 1
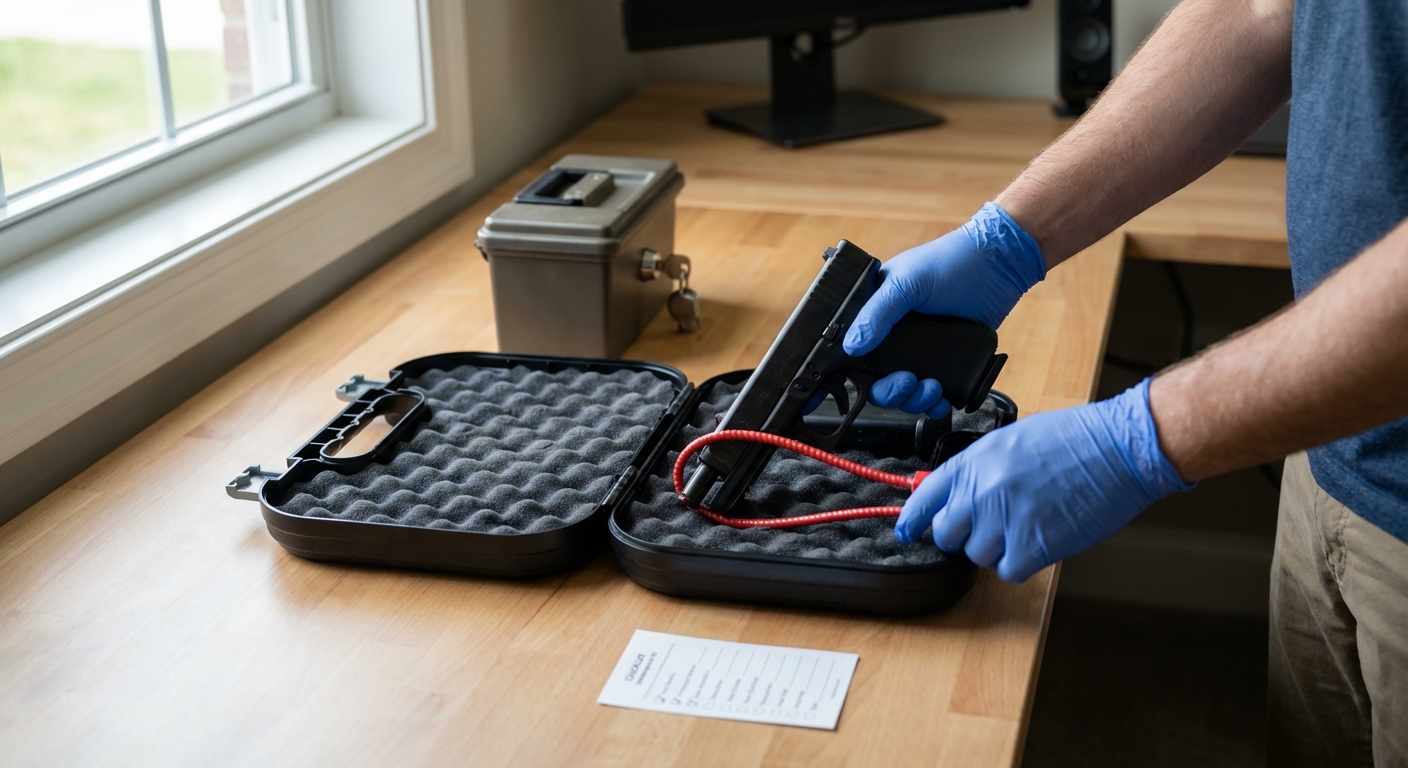
Your first job is to make it truly inert, then make it easy to identify later.
- Assume it’s loaded. Before storage, unload and clear, a safety process to remove ammunition sources and confirm the chamber(s) are empty, so you’re not relying on assumptions. Keep the muzzle in a safe direction and keep your finger off the trigger the whole time (see these core firearm safety rules).
- Unload a semi-auto pistol in the right order. Follow NSSF Project ChildSafe’s sequence: remove the magazine first, then lock the slide to the rear (open the action), then do a visual and physical chamber check of the chamber and the magazine well. The order matters because cycling or racking the slide with the magazine still inserted can feed and chamber a fresh round.
- Confirm “empty” with a look-and-feel check. A visual and physical chamber check means you look into the chamber and then physically feel the chamber area (and for pistols, the magwell) with a fingertip to catch what eyes miss in bad light, odd angles, or simple nerves. NRA and USCCA guidance aligns here: magazine out before you run the slide, then visual and physical inspection to confirm clear.
- Open the action on everything else, then check. The action type changes the mechanics (revolver cylinder open and eject, bolt open and strip ammo from mag and chamber, shotgun action open and unload tube), but the standard is the same: action open, ammo removed, then look and feel each chambered area until you’re satisfied it’s empty.
- Create a one-page ID sheet. Write down make, model, caliber or gauge, and the serial number. The serial is the unique identifier, and it’s typically marked on the frame or receiver. Federal marking rules in 27 CFR 478.92 require a unique serial number on the frame/receiver, marked not readily obliterated, at least 0.003 inch deep with a minimum 1/16 inch print size.
- Photograph condition like an appraiser. Take clear photos of both sides, the serial area, and any wear. Add short notes on what affects value in real appraisals: finish wear, bore condition, matching numbers (where applicable), and aftermarket parts. Clean photos and notes also prevent the time-sink of back-and-forth over “what condition is it really in?”
When you’ve safely cleared the firearm and built this mini documentation packet, storage gets simple because there’s nothing to debate and nothing to guess. You also avoid the classic “wait, what gun is this?” moment when it’s time to move to the next decision.
Step 2
With the gun cleared and identified, the next question is practical: where does it sit, who could reach it, and how do you keep it from walking out the door while you’re waiting to sell?
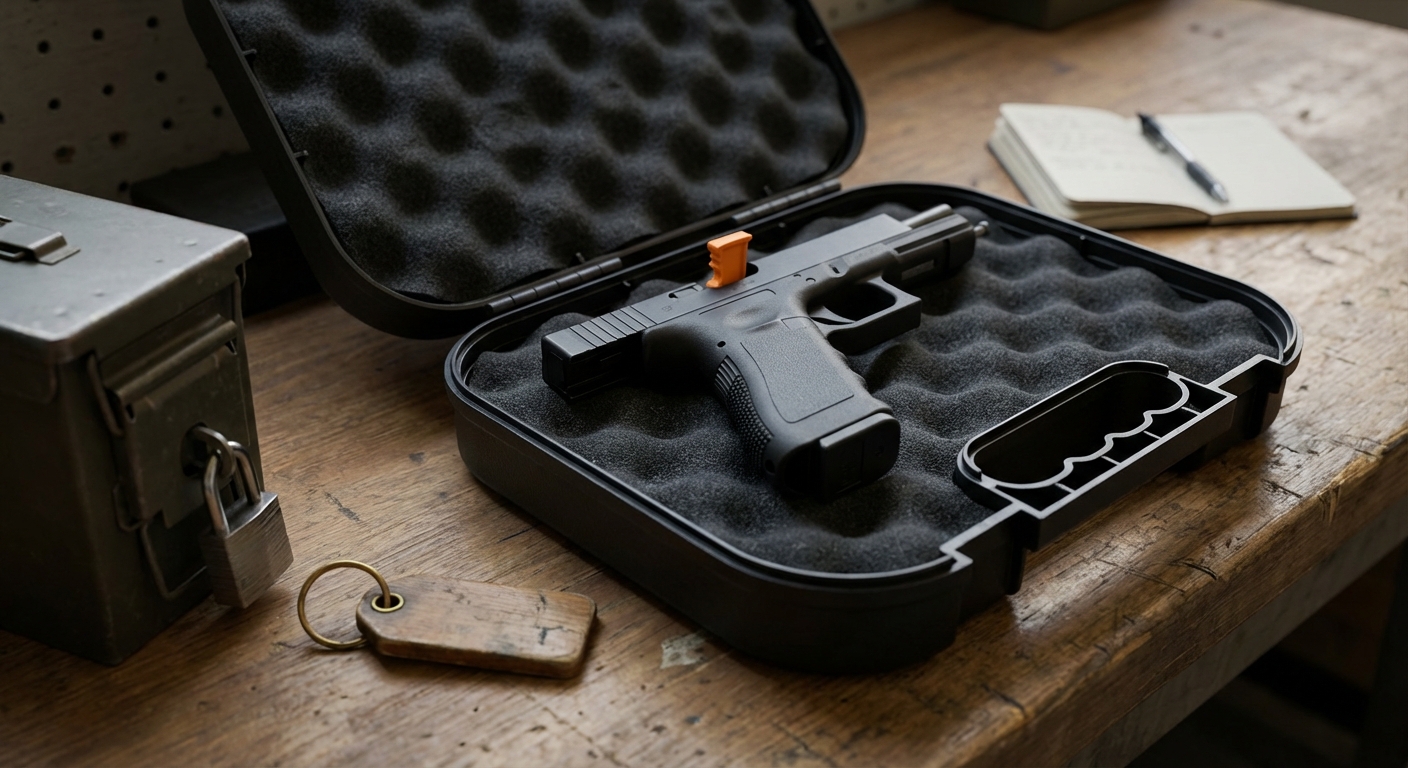
- Assess your real risk window and who’s in the house. If kids or visitors can access the area, treat “a few days until transfer day” the same as long-term storage: locked, controlled, and not easy to walk off with. If you’re storing 1 handgun, a handgun lock box keeps the footprint small and access simple. If you’re holding multiple long guns plus handguns, a full-size safe or locking cabinet stops the pile-up problem fast. Plan for documentation too, you can stage serial-number photos and condition shots while the firearms stay locked between sessions.
- Match the storage type to the tradeoffs you can live with. A full-size safe buys you capacity and stronger access control, but it costs more and is heavy and awkward to move. A locking cabinet is cheaper and easier to relocate, but it’s typically less resistant to prying than a true safe, so it’s better as a “locked room inside a locked home” option. A handgun lock box is the most convenient for one pistol and one user, but it does nothing for long guns. Cable locks and trigger locks are the lowest-cost layer and they prevent firing, but they don’t stop someone from simply taking the firearm itself.
- Anchor anything heavy enough to attract a two-person “grab and go.” UL 1037 Residential Security Container (RSC) is a UL burglary-resistance classification, and the RSC test is one technician attacking for 5 minutes of net working time with specified hand tools. Passing means the tester cannot create a 4 in × 4 in opening or otherwise gain opening access in that timed window, so installation matters as much as the label. Best practice is bolting to reduce removal and tip-over, and tested safes under 1000 kg must be anchored to a solid concrete component. In a tiled room, the practical move is removing the tiles under the safe’s footprint and anchoring directly to the concrete subfloor.
- Control access like you’ll be doing it every day. Pick a lock method you’ll actually use repeatedly, keypad, combo, or key, then set one routine: locked after handling, locked during photos, locked until transfer. The goal is simple: choose secure storage methods and access control that fit your firearm count and household traffic, then install it so it can’t be quickly removed.
Once it’s locked up and access is controlled, the focus shifts from “can someone get to it?” to “will it come out looking the same as it went in?”
Step 3
The easiest way to lose money on a sale is letting storage quietly change the gun’s condition. Even in a locked safe or cabinet, a firearm can still pick up rust, pitting, dings, stock swelling, and optic or finish wear faster than most people expect, especially if it sits through a few humid weeks and temperature swings.
Humidity is the main lever. Relative humidity (RH) is the number you actually manage, and a safe or closet can trap moisture in a small air volume, letting RH climb into the corrosion danger zone even when the rest of the room feels fine. The NRA’s guidance for gun safes is roughly 40 to 50% RH to reduce rust risk, and corrosion engineering references flag a “critical RH” near 60% where atmospheric corrosion becomes much more likely and accelerates as RH rises. Stay below that line consistently, you stop most storage damage before it starts.
- Wipe the exterior metal and any handled surfaces with a clean, dry cloth after you touch it. Fingerprints are salty, and that residue is a fast track to speckling and pitting while it sits.
- Lightly-lube metal contact points and a thin protective film on exposed steel, then stop. You’re aiming for “good enough for a selling window,” not a gunsmithing deep-clean that risks leaving excess oil in places that attract dust and grit.
- Monitor RH with a basic hygrometer placed inside the safe or closet. One glance tells you if you are living in the 40 to 50% RH comfort zone or drifting toward 60%.
- Control moisture with simple tools: an 18-inch electric dehumidifier rod (GoldenRod-type) runs on 110 to 120V AC and is specified to protect up to 200 cubic feet, with coverage varying by model. Pair it with a desiccant moisture absorber inside the enclosure to pull down RH during humid spells and after door openings.
- Position firearms so they do not rub. Avoid crowding, avoid metal-on-metal contact, and keep a stable resting position so slings, turrets, and sharp edges do not grind into neighboring finishes when you move one gun in or out.
What to check weekly: glance at the hygrometer, and do a quick visual pass for any new orange freckles, haze, or fresh contact marks. Catching it early protects the condition details that affect resale value, keeps the gun sale-ready, and keeps your offers where they should be.
Step 4
Once the firearm itself is staying clean and stable, the next place sellers get tripped up is everything around it: ammo, mags, optics, and paperwork.
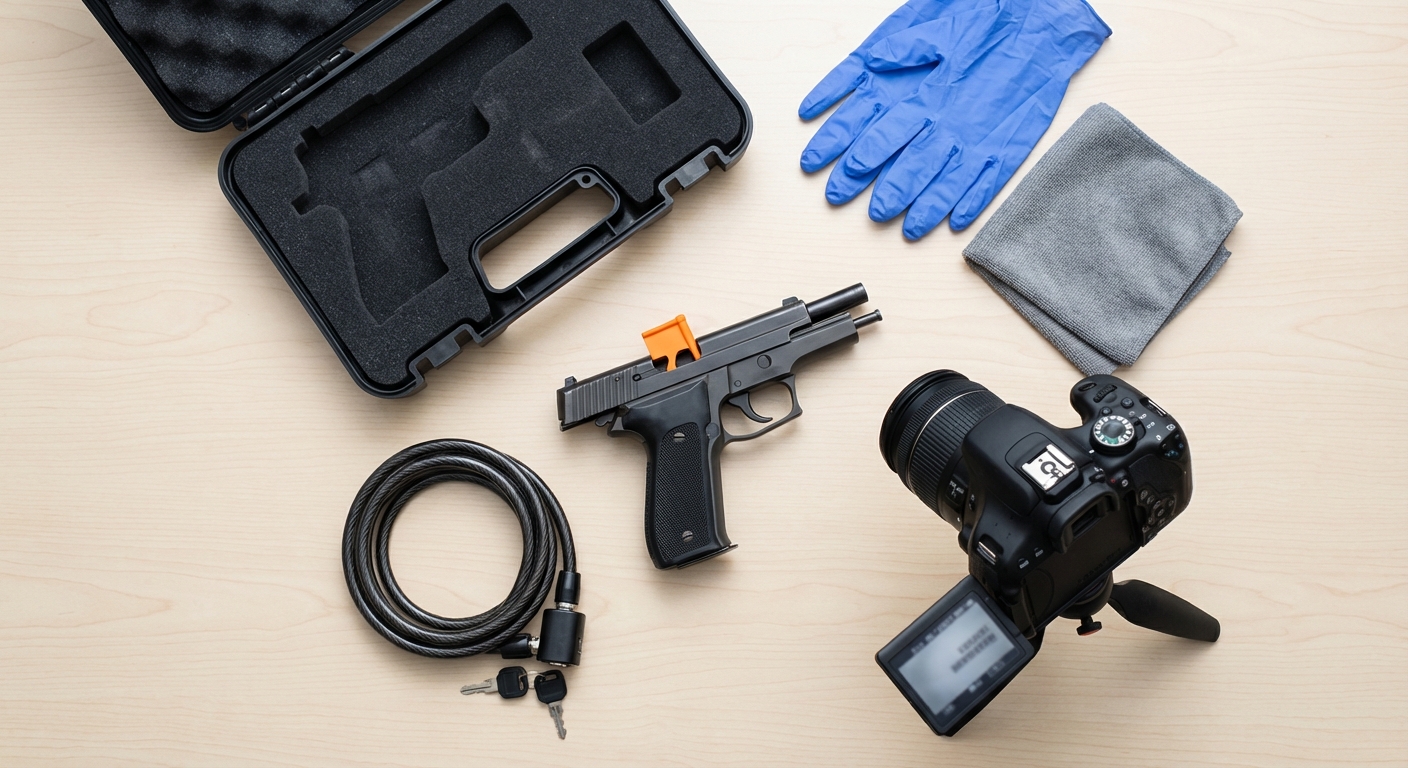
Most sale-day problems aren’t the gun, they’re the ammo, accessories, and missing details. The risk goes up when ammo sits near a heat source, magazines get mixed between firearms, or you cannot prove what was included in the deal. The fix is boring, but it works: separate, label, and lock down everything that travels with the gun.
- Separate anything that is not the firearm itself, ammo, magazines, optics, slings, spare parts, manuals, and your Step 1 photo and condition packet.
- Store ammunition the way SAAMI’s consumer guidance lays it out, cool and dry, protected from excess heat and moisture, and not near heat sources like furnaces, radiators, or hot water heaters. If you reload, NFPA 495 is commonly cited for smokeless propellant storage, but enforceable limits depend on local adoption, often cited examples are up to 20 lb in original containers, and 20 to 50 lb in a wooden cabinet (often described as 1-inch-thick wood).
- Organize accessories by firearm so nothing gets “lost” in a mixed parts bin, keep magazines and small parts matched to the correct gun to avoid confusion and missing-items disputes.
- Protect batteries from shorts and leaks, tape exposed terminals or store cells individually, keep them cool and dry, and inspect for swelling, corrosion, or damaged wraps before you pack anything up.
- Secure records in one place, receipts, manuals, and buyer communication in a labeled folder, plus a backed-up digital copy with access control (password or encryption) (and what to do if you do not have the box or papers).
Use one repeatable format: a zip bag per firearm, a tag that says “Glock 19, mags x3, optic included,” and the date. When you are getting a quote or appraisal from a buyer that also purchases ammunition and accessories, that one labeled kit keeps the listing clean and the handoff fast.
Step 5
Good organization reduces mix-ups, but it doesn’t solve the biggest “storage” risk: someone else getting access, or a sale path that isn’t clearly lawful.
Most legal problems start before the sale, when someone else can access the gun, or when the buyer or transfer method is not clearly lawful. The biggest “storage” risk is not the lock itself, it’s access. This step is basic risk control, not legal advice, you’re trying to prevent an unlawful transfer, unauthorized access, or a deal that collapses because the handoff was never clearly legal (see ensuring your gun is sold legally).
The tricky part is that selling usually involves strangers, roommates, visitors, travel, and sometimes out-of-state interest. Those are exactly the situations where casual access, or a casual “sure, I’ll take it” from the wrong person, turns into a serious problem.
- Limit access while you wait to sell. Keep it secured, and do not let anyone handle it unless you’re confident they should have access. Roommates, overnight guests, and “a friend of a friend” are where avoidable mistakes happen.
- Vet the buyer for prohibited-person risk. Under 18 U.S.C. § 922(d), it’s unlawful to transfer a firearm or ammunition if you know, or have reasonable cause to believe, the recipient is prohibited. Red flags (not a complete list) include “I can’t pass a background check,” talk of felony-level convictions, a qualifying domestic-violence conviction or restraining order, unlawful drug use, or a request to use a straw buyer.
- Route interstate transfers through an FFL. Under 18 U.S.C. § 922(a)(5), you generally cannot transfer a firearm to a non-FFL you know (or have reason to believe) lives in another state. Using an FFL keeps the handoff on the right side of the line, for example, a mail-in buyer operated by an FFL like Cash My Guns.
- Confirm the shipping method before you meet or ship. USPS Publication 52 treats long guns and handguns differently: rifles and shotguns can be mailable under specific conditions, while handguns are generally nonmailable for nonlicensees except narrow exceptions. USPS also requires the firearm be unloaded, prohibits ammo in the same package, and does not allow exterior markings that indicate a firearm.
Before you meet or ship, ask: Are we both in the same state, or is an FFL required? Is the recipient clearly eligible? What carrier and rules apply to this exact firearm?
When in doubt, follow your state’s rules and use a local FFL for the simplest, safest path.
Step 6
Once the buyer and transfer route are squared away, the last thing you want is to create a problem in the final handoff because you got rushed.
Deals fall apart when the last-mile gets sloppy. The final 48 hours is about staying consistent, do not loosen your safety and storage habits just because you’re “almost done.”
Hurry is the real enemy here, you’re juggling accessories, records, and logistics, and that’s when basic steps get skipped. Run this quick routine before any meetup, carrier drop-off, or FFL (dealer) handoff.
- Confirm the firearm is unloaded, then visually and physically check the chamber and magazine well one more time.
- Wipe it down fast, a clean, dry exterior keeps fingerprints and grime from becoming “condition issues” at inspection.
- Bundle the right add-ons and paperwork, magazines, optics parts, keys, manuals, receipts, serial-number photos, and any agreed bill of sale or notes.
- Stage secure shipment or handoff packaging, ship unloaded, use a sturdy outer box or hard case with adequate cushioning so nothing shifts, and follow how to package and ship a firearm so you never walk into a shipper location with an unboxed firearm.
- Transport using the 18 U.S.C. § 926A safe-passage concept, keep it unloaded, and keep both the firearm and ammo not readily accessible from the passenger compartment.
- Verify compliant shipping and transfer details, and if you’re using a nationwide online buyer, Cash My Guns is operated by Dunlap Gun Buyers (an FFL) and describes its service as a nationwide online purchasing service for guns, ammo, and accessories.
Conclusion
You can sell your firearm without letting it turn into a safety, theft, legal, or condition problem while it waits in your care.
Selling creates a weird “in-between” window where routines slip, so stick to the same tight workflow every time: unload and clear it, then do both a visual and physical chamber check, and document identity and condition; pick a storage level that matches your household and timeline, and if you’re using a safe, anchor it; keep the gun sale-ready with sensible humidity control in a practical range and quick periodic checks; keep ammo stored separately, accessories organized, and your records locked down.
Do that and transfer day feels boring in the best way, because access stayed controlled and the firearm stayed unchanged. Verify the rules, avoid prohibited-person and interstate pitfalls, use the right channel, and run a last-mile checklist before handoff. If you want a “Safe • Legal • Hassle-Free.” path, Cash My Guns, “Trusted Since 2013,” is operated by Dunlap Gun Buyers, a federally licensed firearms dealer (FFL), and is available nationwide in all 50 states, per company materials.


")


")


